It took me about five years (duration) to make a Japanese early medieval Japanese lamellar-style armour myself. I´d like to share some background info and prerequisites for making a DIY – Do it yourself- version yourself. One, which is durable, wearable, well-fitting and as close to real as feasible. It´s fun work!
About early medieval Japanese Armour
In early medieval japan, only few samurai and feudal lords were rich enough to get made a complete medieval armour. That was unusual. Armour was too expensive. In fact, many samurai had incomplete armour and where parts that they could get their hands on. Very often, armour parts where gathered and put together – not necessarily did the originally belong together. That is only one reason why the varity of armour is so large.
There are quite a couple of different construction plans for samurai armour. In early medieval times – before the first Europeans, the Portuguese, hit the Japanese cost lines- armour was made in lamellar style. This means, that many overlapping slats where laced together and then be tailored into a wearable armour.
I decided to go for a lamellar style armour. One major reason is, that this main body armour (Do), which is wrapped around the body and tied together in the back, excuses the wearer some extra kilos in weight, easily. Solid Armour – usually, there are hinges involved- do not pardon any change in weight. Lamellar style will perfectly fit.
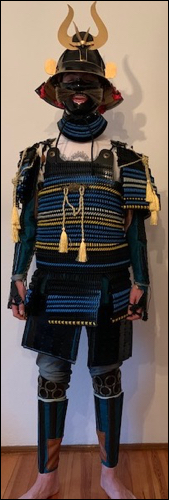
I have constructed the following armour parts
- Curisass (Do) and (Kusazuri)
- Shoulder Plates (Sode)
- Thigh Armour (Haidate)
- Upper-Arm Armour (Kote / Gote) and Fighting Gloves (Tekko)
- Shin Protection (Sunate) und Knee Protection (Tateage)
- Classical Samurai Face Mask (Men Yoroi / Mempo/ Menpo including Throat Protection
- Samurai Helmet (Kabuto) und Neck-Protection (Shikoro)
All was built after some real early medieval models. I did some things quite right – others not. At some stages, I had to follow medieval armour smiths thoughts very closely – especially when it came to fixing the parts to the body. I re-invented solutions and here and there as it showed later that I mostly ended very close to some other real medieval models. Since the variety of Japanese armour is so large, I think there is no blueprint for making one – so this website is rather meant as an inspiration.
Which materials did I use? Traditionally, Japanese armour is made of steel – for the expense ones. Also, paper (Yes paper!! Sheets over sheets glued together and lacquered. Come to think about it… did you ever try to stab a phone book?) and leather was used.
I decided against steel. Reason is simple: You need to be perfectly equipped to work on steel, include furnace and anvil and so on. I don´t have this. So I went for a thermoelastic plastic material of a brand named kydex. This material can be cut with a saw and you can bring it into shape by warming it up in an oven. – so it limits the requirements for tools and equipment a lot.
I also used read-made lamellars which I did not make myself. I needed more that 1700 of those. So I purchased Effingham Plates from an online company called „Plastic Lamellar“.
This is about what you need for making an entire armour yourself:
- Thermoelastic sheets (Kydex)
- Effingham Plates from Plastic Lamellar
- Ofen
- Paracord (a lot)
- Coping saw (manual)
- Drill
- Emery paper and grinder
- Pen, scissor
- Ducttape
- Leather
- Brush and paint
- Linnen fabric
- Cotton fabric
- Needle, thread, sewing machine
- Aluminum sheet
- Ornamentals
- … and probably more…